Pages

Monday, June 29, 2015

Mostly Reading

There's not been much to report on here in recent weeks.  The garden got rather out of hand while my Mum was in hospital as I was going over to Merseyside most weekends.  Now the full flush of Summer has arrived there's been a jungle to clear.  So wargames production has been limited - parts for my 6mm scale Gothic encampment and another Polish pancerny regiment (again 6mm).

What I have had time for is reading.  Scattered around the place are:

  • Oman, The Art of War in the Middle Ages (vol. 1)
  • WRG, Armies and Enemies of Imperial Rome
  • Gibbon, The Decline and Fall of the Roman Empire
  • Webster, The Imperial Roman Army, and
  • Bona, The Dawn of the Dark Ages: The Gepids and Lombards in the Carpathian Basin.
From which you can see that I'm on an ancients trip under the influence of To The Strongest!  My current dilemma is where to concentrate my efforts.  The fourth and fifth centuries are interesting with barbarians ravaging their way across a crumbling Empire.  I quite fancy the Gothic war of the 370s.  But then there's the middle of the third century.  For twenty years from 249 there's a succession of army-proclaimed Emperors and almost constant fighting between claimants to the purple.


226 Persians overthrow Parthians.  Franks, Alamanni, Goths begin to appear along the Rhine and Danube.  (Oman)

236 “Onslaught of the Quadi Carpi and Goths on the middle and lower Danube” beaten back by Maximinius I and Philip.  (Oman)

249 Decius overthrows Philip - civil war in Empire. Goths cross the Danube and Balkans, overrun Moesia and Thrace, scattering Imperial troops before them. 

251 Goths defeat Decius (and son) art Forum Trebonii / Arbutus (Razgrad, Bulgaria).  First Roman Emperor to be killed in battle with barbarians.

Goths range almost unresisted over the middle provinces of the empire for 20 years.  Raid as far as Athens and Dyrrachium (Durres, Albania).  Other Goth armies cross the Hellespont and sack Chalcedon, Alexandria Troas, and Ephesus (western Turkey) and Trebizond (Black Sea coast).

258 Sapor’s Persians overrun Mesopotamia and capture Valerian. 

269 Battle of Naissus (Niš, Serbia), Galienus(?) defeats the Goths. 

After 268 Claudius, Aurelian and Probus reconquer the west from rebel Caesars, clear the Germans out of the Balkan peninsula, win back the east from the Persians and Palmyrenes.

271 After defeating another Gothic invasion, Aurelian abandons Dacia north of the Danube to rationalise the borders of the empire.

297 Diocletian reconquers Britain.

357 Julian defeats south German tribes near Strasbourg.

376 In the summer and fall of 376, tens of thousands of displaced Goths and other tribes arrived on the Danube River, on the border of the Roman Empire, requesting asylum from the Huns. Fritigern, a leader of the Thervingi, appealed to the Roman emperor Valens to be allowed to settle with his people on the south bank of the Danube, where they hoped to find refuge from the Huns, who lacked the ability to cross the wide river in force. Valens permitted this, and even helped the Goths cross the river, probably at the fortress of Durostorum (modern Silistra), Bulgaria.

Valens promised the Goths farming land, grain rations, and protection under the Roman armies as foederati. His major reasons for quickly accepting the Goths into Roman territory were to increase the size of his army, and to gain a new tax base to increase his treasury. The selection of Goths that were allowed to cross the Danube was unforgiving: the weak, old, and sickly were left on the far bank to fend for themselves against the Huns. The ones that crossed were supposed to have their weapons confiscated; however, the Romans in charge accepted bribes to allow the Goths to retain their weapons.  (Wikipedia)

378 Battle of Adrianople, Valens and 40,000 Romans killed in battle (near Edirne, Turkey/Bulgaria border).

379 Goths move into and plunder Dacia (western Romania).

380 Goths divide.  Tervingi under Fritigern move into Macedonia.  The Greuthungi move into Pannonia where they are defeated by Gratian.

381 Western Roman forces drive goths back into Thrace.

382 Peace agreed.

Tuesday, June 23, 2015

More Micro Ancients

With Sharp Practice out of the way I've gone back to completing my armies for To The Strongest!  I plan to have Late Roman and Goth armies.

The selection of Baccus minis at Wargames Emporium is pretty thin at the moment but I managed to find a pack of Saxon archers.  They are intended for the eleventh century (1066 and all that) but they'll do for pretty much any Dark Age skirmishers with bows.

I've also made a camp base that will sit inside my forthcoming Gothic wagon laager.


Sunday, June 21, 2015

The Action at Quatre Jambes

It's with some heaviness of heart that I come to write an account of last weekend's Waterloo Campaign game of Sharp Practice; not because the rules or scenario didn't work but because I, as one of the Allied commanders managed to get comprehensively beaten!

This was our biggest ever game of Sharp Practice and the first time Jamie has designed a scenario and seen it through to being played by a bunch of our friends.

For this game, our kitchen table was extended out to its full 8'x4' extent and decided by a river into two sectors.  To the west (nearest the camera in the shot below), Carl's Frenchies lined up against my Allied infantry (two groups of British and two of Nassauers) in what was expected to be a straight attack vs defence game.  This was sort of Quatre Bras in micro-cosm, hence the title of this post.  


Beyond the river was a small Belgian village where an improbable gathering of heroes were to search for the missing British agent Stephen Maturin.

Leading the search for the French was Brigadier Etienne Gerard (Andy Sangar).  Also for the French was Admiral Lord Hornblower (Jamie Crawley), blackmailed by French threats to execute the captive Lady Hornblower.

One the other side of the table Lt Col Richard Sharp (Gus Woodward) and Matthew Hervey (Ron Pierce) led the search for the British.


The cards were reasonably kind to the British in the earl stages if the game and I managed to form a line formation to defend the cross-roads.  I had only infantry but felt that I could form square if any enemy cavalry turned up.  Initially, though, I had only French Infantry opposing me.

Meanwhile, Sharpe, leading some riflemen, moved towards the village church.


Meanwhile, Brigadier Gerard led a patrol of his Hussards de Conflans towards the village, supported by some grenadiers.


At this point a French 'blind' that had been moving past the crossroads suddenly proved to be a unit of Dragoons!  No problem, I thought, I should have plenty of time to form square....


Unfortunately I didn't.  Although the British infantry were able to see off the the French assault (albeit with serious casualties), the Nassauer commander's card never came up again through the rest of the game.  A quick charge by the dragoons utterly annihilated the Germans and left the French firmly in control of the cross-roads.


Gerard, in typical Gerardian fashion, abandoned his mission of finding Maturin on seeing the opportunity to pursue the defeated allied troops. His hussars clattered over the bridge.

The left Sharpe free to find Maturin hiding in the church and make off with him to the safety of the Duchess of Richmond's ball.


This game confirmed my opinion of Sharp Practice.  It's a set of rules that gives a reasonably enjoyable game but the impact of the card driven mechanics with the Tiffin card ending the game turn unexpectedly can throw off the balance of a scenario however carefully the umpire may have planned it.

In retrospect it seemed a little unfair that charging cavalry get to move on the Tiffin card but infantry facing them can't even attempt to form square in response, perhaps for several turns if the cards have been cruel.

I suspect any game of Sharp Practice will bring up a number of situations where the rules are either silent or saying something that on the face of it seems inappropriate.  My view is that they really need an umpire to take an unbiassed view on such cases.

Saturday, June 13, 2015

Napoleonic Characters part two

The final (probably) addition for tomorrow's game is this mounted officer.


A veteran of the 95th Rifles, he now serves as a Lieutenant Colonel of the Dutch army on the staff of the Prince of Orange.  Despite this he retains his threadbare rifles jacket and the cavalry overalls he took from a dead Frenchman in Spain.

His battered hat bears a cockade in Belgian national colours and he rides a captured French horse.


Thursday, June 11, 2015

Napoleonic Characters

Jamie and I are putting on a Hundred Days-themed game of Sharp Practice on Sunday and I needed some personality figures.  I raided the boxes of as yet unpainted figures in storage and came up with these four after a little, very hasty, painting:


From the left we have a British Admiral, last reported in the south of France with his wife, Lady Barbara, but somehow now transported to Belgium.  Then we have a well-known physician who has served as a ship's surgeon in the Royal Navy to take advantage of the opportunities to see the world's wildlife and to pursue his secret calling as a British agent.  Then there's his friend, a great bear of a man and Royal Navy master and commander.  Finally, there's a senior French hussar officer, secure in the knowledge that he is the greatest horseman, swordsman and lover of his generation.

The admiral is a figure from the Italeri Napoleon's Marshals set.  The surgeon is a converted HaT Spanish guerrilla.  The captain is Henry Picton from the Waterloo 1815 Mounted Line Officers box.  The Hussar is an Italeri French hussar on a horse I found in the spares box. 


These guys were painted for speed rather than accuracy.  They'll do the job.  A certain veteran Rifles officer is yet to be completed.

Saturday, June 6, 2015

6mm Status Markers

When I bought To The Strongest!, my old mate Simon Miller very kindly sent me a pack of his laser cut counters as he knew that I'd be playing in 6mm scale and the counters would be much more manageable than the default approach of using a deck of playing cards.

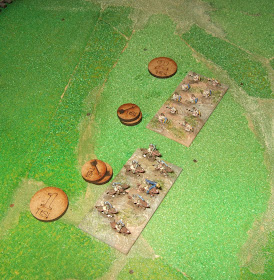
If you're going to play TTS! I strongly recommend that you buy a set of Simon's counters.  They look like this:


I'm always keen that the look of a game should be compromised as little as possible by the presence of markers on the table.  The larger discs, activation markers, are all removed at a particular point in the game sequence so photos can be taken when the table is relatively clear.  They are a little large for my scale but I can live with that as you're always balancing intrusiveness with ease of handling.

The smaller, ammunition status, markers on the other hand are more problematic for me.  Most units in my Late Roman and Gothic armies are accompanied by up to three of these throughout the game and I find the stacks of counters a pain to move and to fit into what can often be crowded squares on the table.

Last night I had an idea and this morning I finished some prototypes of an alternative marker style.  These markers are designed to unobtrusively show any numerical status from one to three.  You can use more than one if you need higher numbers.

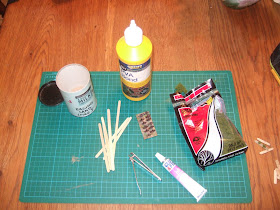
You will need...


... some wooden coffee stirrers, some fine sand, and some clump foliage.  You'll also want PVA and clear glue and a set of toenail clippers.  Oh and some sandpaper.

If you're making more than one of anything always make a jig.  In this case the 'jig' was a unit of cavalry, against whose base side I measured off lengths of coffee stirrer.  I decided to make the markers just over 30mm long.


Having marked the length with a pencil, a couple of cuts with the toenail clippers gives you a roughly rounded end which can be tidied up with a couple of passes on some medium grade sandpaper to match the original radius end of the stirrer.


You end up with something like this:


Next, smear your pieces of coffee stirrer with PVA...


... note that we're now working on a sheet of paper for reasons that will soon become obvious. In fact they become obvious now as we pour sand onto the wet PVA:


When the sand has dried you get these:


Which you then paint (I always use at least two shades of brown when basing figures and did so again here)...


... drybrush (Vallejo Iraqi Sand in my case)...


... and, using the clear adhesive, stick on one to three pieces of clump foliage:


The resulting markers should be reasonably easy to handle and will quickly communicate the ammo status of the units they are placed behind.  Like this...


... or like this:


As you can see, even with two units in a square, the new markers fit neatly.  With Longbow or Artillery units that get six ammo I'll simply use two strips.  I may make some slightly shorter ones for the purpose.


Thursday, June 4, 2015

Ready for the Blitzkrieg

My 1940 French force is finally based up properly for Blitzkrieg Commander.


Most of the models (1/300th scale from H&R, Scotia, Irregular, and some scratch builds) were painted years ago but it's been a plan of mine to get all of my 6mm stuff based up for Blitzkrieg Commander and that's now officially done.

The force is roughly based on being able to field most if not all of 4eme Division Cuirassée de Reserve (4DCR) the armoured division commanded by de Gaulle in 1940.  In fact I have more vehicles than de Gaulle ever had at any on time (at least at one model to the platoon scale).

Up front is the recce group with Panhard 178 armoured cars.


Then we have the Grand Fromage himself - CO unit flanked by two anti-aircraft half tracks.


Then we get to the teeth.  46eme and 47eme Bns de Chars with Char B1 bis.  All Scotia models except for one H&R.


Then we get the rest of 6eme Demi-Brigade de Chars; Chars D2 in this case:


Then we have the elements of 8eme Demi-Brigade de Chars. These guys are equipped with Renault R-35s.


And a couple of R-40s, leading the six platoon column.


Later in the campaign (25th May), the 3rd Cuirassiers (Hotchkiss H-39s and SOMUA S-35s) were attached to the division:


Next in the order of battle is 4eme Battaillon de Chasseurs Portées, a motorised infantry unit riding in requisitioned civilian buses, infantry companies on the left and support company (25mm AT guns and mortars with Citroen trucks on the right.  They are backed up here by the 1/7eme Battaillon de Chasseurs Portées in Lorraine chenillettes.


I seem to have acquired plenty more infantry - nearly three battalions' worth here:


The division was fairly well set-up to resist enemy armour - here are some 47mm weapons of the divisional anti-tank batteries.


Then we have the artillery.  Lots of Mle1897 75mm guns:


And a regiment of 105mm guns as well:


Having painted some spare trucks and half-tracks I have a logistics train, sort of...


...and a few assorted supporting types; a platoon of Chasseurs Alpins, a Renault FT-17, and a Char d'Assault 2c.


Finally there's a bit of air support.  Two Bloch and one Breguet light bombers and Moraine Saulnier fighter:


I think, to be honest, I've probably got too much stuff.  I'd certainly struggle to use all of the infantry unless we do a really large game.

Next target is to get my 1940 German army similarly based.

Tuesday, June 2, 2015

Action At Macho Grande

So we played our first game of Sharp Practice for some time this weekend.  As I was umpiring and struggling to remember the rules, I didn't take too many photos.  Here's an atmospheric black and white shot of the table.


Gus with two nine man groups of 95th Rifles started on the left between the wheat field and the cabbage field. Arthur (with a group of British Light Dragoons and the overall British commander, Major McLeod) began behind the woods on the right.

Jamie, who had a unit of French Dragoons and the escaping Colonel Lamarck with his wagon and mules, began on the road in the middle of the village of Macho Grande.

Andy meanwhile had a large force with two French guns atop the far cliffs and 40 fusiliers at their base.

The Colonel's mule train and dragoons escort just had to make a dash for the cliffs at the far end of the table where the French Artillery, and safety, awaited.


Jamie got the chance to move first and immediately moved his Dragoons to occupy the houses to the left (west) side of the road.  This would prove vital later. Andy meanwhile began a general advance with his infantry.

To the east of the road, Arthur moved his light dragoons up through a cornfield towards the village.  It looked like he would be best placed to intervene to stop Lamarck's caravan.  Gus moved towards the two houses making up the western side of Macho Grande.  His first group launched an attempt to storm the bigger (northern) house but they were weakened by the dragoons' carbine fire and artillery fire from the hills.  They failed on their first attempt to fight there way in at sword-point (rifles fix swords, not bayonets).


While this had been going on, Andy had continually advanced his fusiliers.  He was soon able to form a line formation facing towards the wheat field Arthur's light dragoons must cross.


Riding across the front of a formed infantry line was never going to be easy for the British horse.  By the time the photo below was taken they'd already lost two men and picked up a couple of shock points.

The cards and the dice were cruel to Arthur and he didn't get to move quickly enough to get out of the fire zone.  By the next turn he was reduced to just the two Big Men (McLeod and the light dragoon sergeant).


Unable to prevent Lamarck's escape, Arthur and Gus decided that discretion was the better part of valour and the survivors made for the bridge and safety.


Whilst I was reasonably happy with how Sharp Practice handled the action, I've come to the conclusion that the Too Fat Lardies design a good set of rules but they don't always write them well.  There were a few cases where the wording was unclear or ambiguous.

In one case we had to "reduce the number of dice rolled by two thirds (round up)".  What does that mean?  Calculate two thirds of the total (rounding up to a whole number of dice) and then deduct this from the total?  Or deduct the two thirds and then round the resulting number of dice up to a whole number?

Now you might point out that it's only one die either way and as long as you're consistent what's the worry?  But it caused confusion and slowed down the game unnecessarily while we worked out what to do.

Nonetheless the effort we've invested in relearning the rules will stand us in good stead in two weeks' time when we play another Sharp Practice game a few days before the 200th anniversary of Waterloo.