This is the set of horse and musket rules in Henry Hyde's The Wargaming Compendium. They are advertised as covering the period 1685-1845 so I figured they'd be spot on for my 6mm Great Northern War collection.
The rules use element bases and, at least in theory, individual figure removal. However, it's clear from photographs of games in action that most players have their figures permanently mounted on the element bases and use some means of tracking the loss of strength points. I used a notebook with stylised depictions of each unit.
I ran a solo game based roughly on the scenario Henry uses to illustrate the rules in the book. The forces used were bits and bobs of my GNW Russians and Poles transposed respectively into the imagi-nations of Zheltarus and Tszervonsk.
SSS (let's call it that) has varying sized units from extra-small (one base) to extra large (six bases). This means that my four-base units, built with Maurice in mind, are "Large" in these rules. This doesn't seem to be a problem though.
Also not a problem, as far as I can see, is the fact that my element bases are square rather then slightly wider-than-deep.
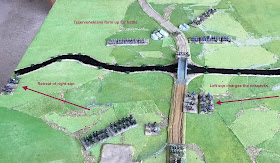
Anyway, on to the game. Some forces of Tszervonsk were encamped at a bridge near the town of Lubomir (a centre of the Tszervonskian brewing industry). They are led by the competent general Dragomir Dragomirov. The camp can be seen to the left of the river in the picture below.
The only troops ready for trouble are two squadrons of the King's Valaks - A class, unarmoured, skirmishing cavalry with lances and bows in SSS terms. They are patrolling the far side of the river.
Oh and a small patrol of the Lubomir Militia are guarding the bridge...
Approaching was a Zheltarussian detachment led by the hesitant Robert McCrumb. We know he's hesitant having generated his character previously. McCrumb has two infantry battalions, a regiment of dragoons, a regiment of cossack, and a couple of guns.
Turns are alternate in SSS. The Zheltarussians went first and were able to bring on three units. Hunni's cossacks dashed straight up the road making for the bridge. The Poliakov Dragoons moved off to menace the right squadron of King's Valaks and Lukin's Regiment marched up the road.
Below we see the position before the first Tszervonskian turn....
Things then got moving quickly. The right squadron of the Valaks took a reaction test to see if they could charge the Poliakov Dragoons. Being skirmishing cavalry they didn't need ordering to do this being used to operating away from their general's direct influence. Unfortunately they failed he test so badly that they ended up retreating right off the table!
On the other flank the left squadron were delighted to charge the temptingly exposed flank of Hunni's Cossacks. The results were spectacular. Half of the Cossacks were killed in the charge and the Cossack regiment disintegrated.
This, however, left the remaining Valaks rather exposed. Lukin's Regiment formed line astride the road and let fly a devastating volley. The remaining Valaks were slaughtered almost to a man.
Combat is straight-forward. For each base firing, roll a number of six-sided dice determined by the type of unit. Modify the number needed to score a hit for things like range (three brackets), cover, target formation, and of course that old favourite "first fire". The target then gets to try a saving throw for each hit. The save number varies depending on who's hit you - 3+ against pistols but sixes needed if you're shot at by artillery.
I took my time with the game, not hesitating to go away and read the book if I didn't understand how something was meant to work.
When I needed to stop we'd reached the point where both sides had sent cavalry units along the river looking for places where it could be forded. Both were ultimately successful.
Below we see Dragomirov's Panczerny crossing the river.
 |
I enjoyed these rules and would like to get them to a Saturday Afternoon Wargame soon.
I still have a few queries. A unit disintegrates when it reaches half-strength. But is that half-strength in bases or figures/strength points?
With a normal unit being three bases this is a key question. A three base battalion of close order infantry will have 18 strength points. Does it fall apart when it's lost nine strength points or when it's lost two bases?
I'm also a bit unclear on reaction tests to charge. Hopefully an email to Henry will clear things up.


Looks like an interesting game, I hope it provided you with some comfort during your convalescence! Here's a link to mine and Andy T's own recent game, giving Maurice another run out. http://neilsgaming.pbworks.com/w/page/131887644/Battle%20of%20Pitzer%2C%207YW
ReplyDelete