Sunday, December 30, 2018

Once Upon a Time in the South

I arranged two wargames over the Christmas - New Year period this time.  We started with a first outing for my Maximilian Adventure forces since I declared them completed.

This was meant to be a four player game but Richard P was unable to join us as his father was ill in hospital.  The best wishes of all at stately Counterpane Manor go out to Mr Philips senior.

Set in 1865, our game involved a force of French Tirailleurs Algeriens (or Turcos) who had been ambushed by a superior number of republican guerrillas and who have retreated to a derelict hacienda.  So far so Camerone.

Where things differ this time is that rescue is one the way.  A mixed column of contra-guerillas is marching to the sound of the guns.

With the Imperialist forces split in two it made sense to have one player looking after the Turcos and one the contra-guerillas.  This left one Republican player commanding the largest single force in the game.  Jamie being the most experienced Sharp Practice 2 player, he copped for that role.  Leo played the Turcos commander and Gus led the contra-guerillas.

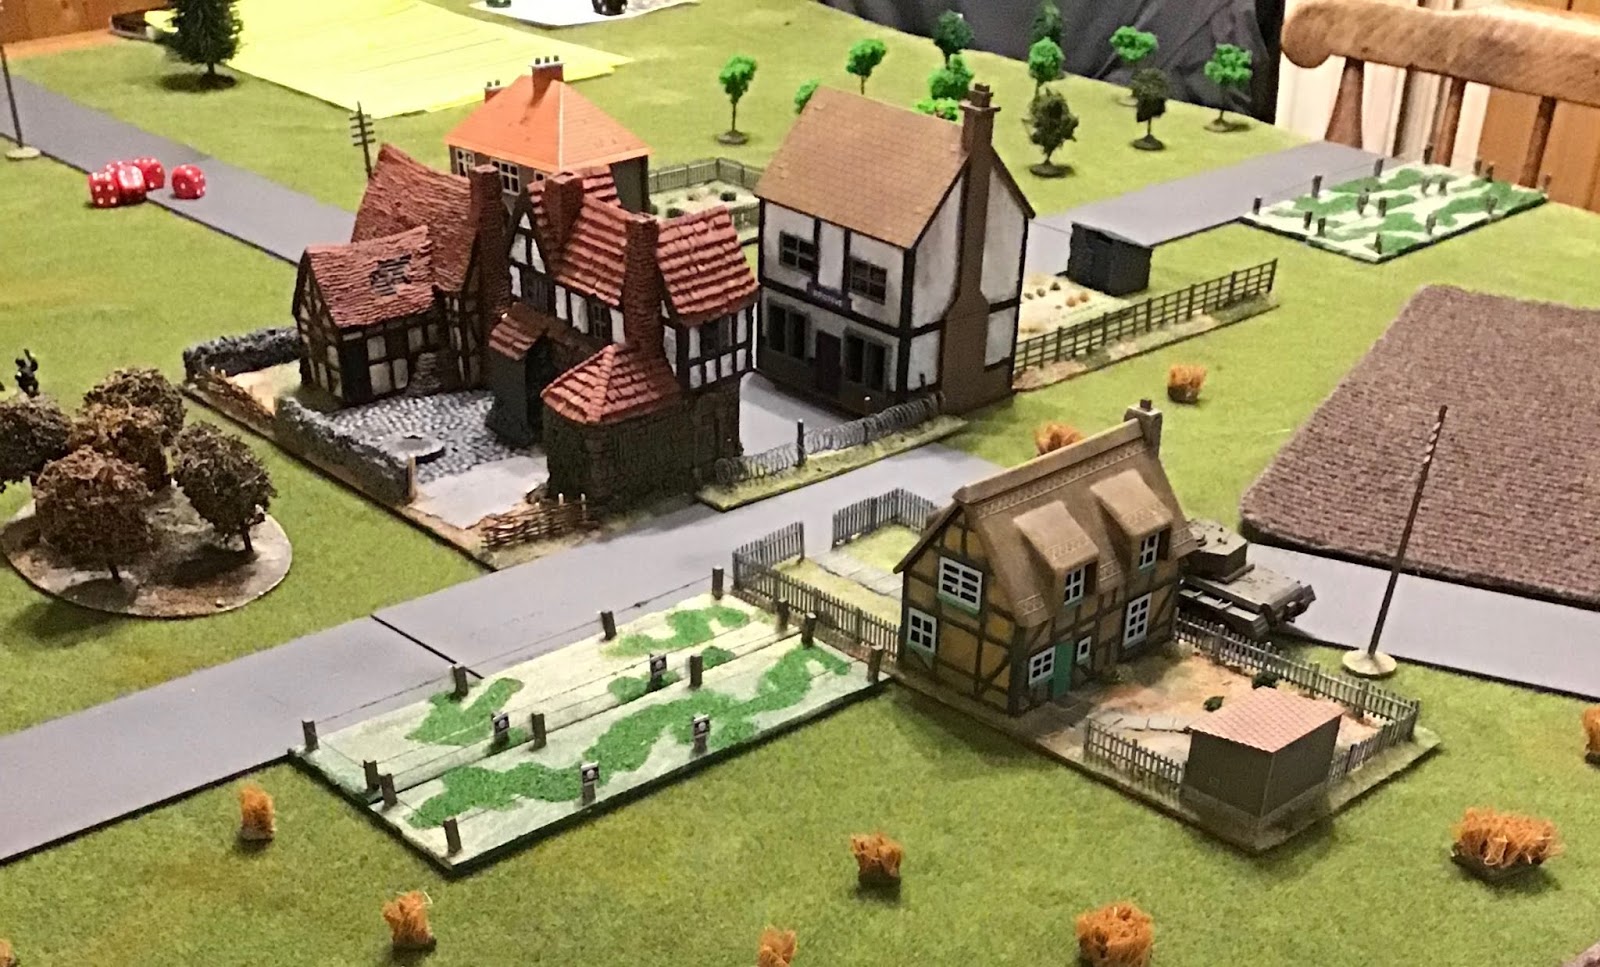
I failed to take a pre-game photo of the battlefield but this early shot shows most of the layout:

The main road from the provincial capital is in the foreground.  A tree-lined stream can be seen on the left.  A side road runs up to the main house of the hacienda past a couple of outbuildings.

The main house (remember a hacienda is actually the whole estate, not just the owner's mansion) has a courtyard in front that's surrounded by eight-foot-high walls.  The front gate has long-since been broken up for firewood but there's a reasonably stout side door on the side facing the stream.

All three players were faced with tactical decisions right from the start.  Leo's Turcos could manage to salvage enough ration boxes and abandoned furniture to build either a barricade across the main gateway or to construct a firing platform to allow one group to fire over the courtyard wall.  Leo chose the former and his men set to work.

Jamie's Republican forces included a group of Zapadores (engineers).  They were likely to be useful in breaking into the courtyard and Jamie set them to work breaking down the side gate.  Clearly this would not be a quiet job so the Turcos were able to plan their deployment knowing that an attack from that quarter was imminent.


Gus meanwhile started with no chits in the hat.  He could only add his officers' chits to the bag from the start of turn two and only if he made the right die roll.  The score needed on the die would vary depending upon which elements of his column he rushed to the scene.  Gus chose to lead with his single group of cavalry and with both of his groups of infantry.  This gave him only a 50:50 chance of getting hit chits into the hat on turn two but he made the roll.

In the meantime, Jamie had brought on three groups of Republican regular infantry to support the zapadores on the river side of the house.  Two groups of state militia and one of skirmishers deployed on the opposite side. Finally, an imposing-looking group of lance-armed Republican cavalry formed up to protect their flank.


Even without the contra-guerillas deployed the forces were beginning to look quite impressive.


The contra-guerillas now deployed on the highway.


A clash between the two groups of cavalry now looked possible.


And the Republican cavalry was supported by skirmishers.


Sergente Asdrubal Cortez was careful to lead from the rear!


But Gus's dice rolling continued to be helpful as far as the arrival of the contra-guerilla forces was concerned.  Their artillery was soon deployed facing the enemy cavalry.


Withering fire from the mountain gun and from the accompanying contra-guerilla artillery soon had the Republican lancers turning tail.


Although the contra-guerilla cavalry had taken some casualties from the fire of the Republican skirmishers.


By now the zapadores has broken down the side gate of the hacienda yard.  Some casualties had been taken on both sides when Jamie decided to launch his regular infantry into an assault through the gate.

I ruled that the defending Turcos would gain the benefit of defending hard cover.  They were also rated as Aggressive.  Together these two factors were enough to put the slightly outnumbered Turcos at an advantage.  Jamie's poor dice rolling did the rest of the job and the Republican infantry were routed.  They fled across the stream taking two Leaders with them.  In one combat the Republican Force Morale fell from nine to zero and the battle was over!


So a bit of an early finish, but it gave us the chance of a leisurely pack-up and allowed Gus to drive back to Nottingham in the daylight.

I'm pleased with the Maximilian Adventure collection; I thought they looked good en masse.  I must organise more Saturday Afternoon Wargames this year so I can make sure they see a reasonable amount of use.


Wednesday, December 19, 2018

The Road to Bremen, Table 2

Jamie and I managed to make time among the Christmas preparations to play the latest game of our Chain of Command campaign – The Road to Bremen.


This latest action saw my British platoon attempting to attack a small farm surrounded by low-lying, boggy fields.  Jamie, defending, had, I knew, a platoon of Heer infantry though I didn’t know what additional supports he might have chosen.


I’ll describe all the locations as left and right in terms of the view from my edge of the table (as per the view above).
The Patrol Phase saw Jamie well established on the hedgeline leaving me with only the doubtful cover afforded by the lateral road.  As they were slightly raised over the surrounding farmland, we decided that roads would give light cover to troops on foot but only if they were stationary immediately behind them.  I had a Jump-off Point reasonably well advanced on my left flank and Jamie had one rather in the middle of nowhere towards his left rear.


Jamie chose to put a minefield in front of the right-hand hedge and a run of barbed wire connecting the two hedges.


With 19 points of support available I decided to go for a tank (a Comet as we’ve switched the campaign round slightly to suit my 11th Armoured Division collection), an engineer section, a medical orderly, the battalion adjutant, and a two-vehicle section of Universal Carriers. 
It seemed obvious to me that Jamie would need to defend the hedgeline in strength. My plan was to establish a base of fire near the centre of my baseline under the control of a Senior Leader. With the two MGs in the carrier section and the firepower of the tank, I could probably hope to gain sufficient superiority over troops at the hedgeline to capture it with infantry sections deployed from the advanced left hand JoP.  The platoon’s 2” mortar would help by screening off some enemy troops (probably those defending the hedge on my right) with smoke.


As he has in every game so far Jamie had rolled a six giving him a starting Force Morale of 11.  At least this time I was on a respectable nine points.
Jamie took the first phase and deployed a section behind the left-hand hedge, near the barn. Their NCO put them on Overwatch.


I then got a reasonable hand of dice and deployed my carrier section on the road and began to pour fire into the German section.  At this point I made a poor decision.  I realised that putting my 2” mortar next to the road on my board edge would mean it as in the open to fire from one hedgeline or the other.  I decided therefore to use the righthand JoP and put the mortar and the platoon Sergeant behind the lateral road.  They were able to put smoke in front of the enemy LMG but the SL was no longer where he should have been – near the central JoP and the road, directing the fire of my support elements!


At this point Jamie got the first of what would be a plethora of consecutive phases and used them rally off shock and pot away ineffectually with his first squad’s rifles whilst deploying a second squad behind the right-hand hedge immediately next to the road.


I tried to fire smoke to mask off the right-hand squad but it fell long. I moved my carriers forward slightly to improve their lines of sight and to keep them away from the board edge in case of forced withdrawals.  I also deployed Cpl Elliott’s section (down two men because of casualties in the first battle) to a position behind the lateral road to the left of the Bremen highway.

At this point Jamie got a second pair of consecutive phases.  He spent both firing causing two fatalities in Elliott’s section and killing one man in my 2” mortar team.
I decided I needed more firepower against the squad facing my left. I deployed Cpl Parker’s section from my left edge JoP and they inflicted a casualty and some shock on the Germans in front of them.

Jamie decided to pull back the squad on the left – exposed as it was to fire from the carriers and from two rifle sections (albeit Elliott’s section was now very depleted).  The other German section continued to fire at my mortar team.
The withdrawal of the left-hand squad allowed me to switch the carrier section’s attentions to their compatriots on the other side of the road.  The effect was impressive – two dead and the Junior Leader lightly wounded.  Unfortunately there was no reduction in Jamie’s Force Morale; still at eleven!

I deployed my mine-clearing team next to the remaining 2” mortar man in the hope that they would share the incoming fire and I reorganised Elliott’s section, moving one man from the rifle team to help keep the Bren firing.  Finally, I moved Parker’s section forward towards the extreme left end of the left-hand hedge.

At this point Jamie’s right-hand squad got their eye in.  A burst of MG42 fire killed the one remaining member of the 2” mortar crew.  Fortunately I too lost no Force Morale – still on nine.

Even more firepower needed!  I brought on the tank, deploying it off the road in the muddy field.  That way it had a clear field of fire past the carriers.  If I didn’t move it there would be no need to worry about it bogging down.


And of course Jamie now got a series of three consecutive phases!  This was getting silly!

The dice weren’t completely kind, though, with many fours and fives accompanying the multiple sixes but Jamie was able to rally off loads of shock and move his left flank LMG into a position where it could fire along the narrow gap between the hedge and the back of the barn.  We noted, though, that this put it directly behind the hedge and so once more targetable by my lads.


When I finally got to go again I had Parker’s section throw a grenade and fire at the newly visible LMG team killing one of its members.

And then Jamie rolled another double Phase (his fourth of the game so far!) and wiped out my wire cutting team.  My Force Morale fell from 9 to 7.  This left Sergeant Hill on his own, cowering behind the slightly embanked lateral road and too far away from the resto of the force to be much use.  Jamie also spent a Chain of Command die to move his left-hand Jump-off Point back to safety behind the farmhouse.  He’d learned his lesson after I captured all three JoPs last time out!

On my next Phase I finally completed a CoC die but more importantly managed to wipe out the LMG team in the left-hand German squad.  The German Force Morale fell from 11 to 10.
With the remnants of that squad looking vulnerable, I decided to launch Parker’s section into a close assault.  It was bloody!  The Germans were wiped out, their Force Morale falling again from ten to eight.  I lost five men killed (including the whole Bren team) and Lieutenant Lane received a light wound.  I spent my CoC die to avoid one morale check but still my Force Morale fell from seven to six.


With but a single Phase (for once) Jamie deployed his third squad by the Farmhouse in the rear, putting them into Tactical.

In response I moved Parker’s section and the lieutenant back behind the barn.  And only just in time as Jamie now got ANOTHER triple Phase, which he used to put down fire across my front, killing a member of the recently deployed mine-clearing team (I’d brought them on to beef up Elliott’s section) but conspicuously failing to hit Sgt Hill.  He also moved forward his third section.


My next phase saw me roll 35556.  Not what I needed at that time but at least the tank could fire. The hull MG put down covering fire on the enemy squad informant of my right and a 77mm HE round decapitated the squad’s Obergefreiter reducing Jamie’s Force Morale from eight to six.


At this point Jamie spent a newly acquired CoC die to ambush with his Panzerschreck team. The round ploughed harmlessly into the mud short of the Comet.
That Panzerschreck round probably passed a few inches over the head of Sergeant Hill who, by now, had managed to crawl to a position nearer to the central road.  At last he could now influence the main battle.  Under his direction fire from the tank and the carrier section devastated the wiped out the Rifle Team of the right-hand squad.  German Force Morale fell to five.
Jamie was now down to one squad and an LMG team on the table.  Fire from my tank and carriers, once again directed by Sgt Hill, killed a member of the LMG team and caused some shock.  I should mention here that I apparently got this wrong - an infantry Senior Leader can't activate a supporting tank.
In the same Phase I sent Parker and Elliott’s sections forward to the hedge in front of the barn.  Oh, and deployed the medical orderly who set off after the wounded Lt Lane.


You’ll not be surprised to learn at this point Jamie embarked on yet another triple Phase. Perhaps more surprising was that he passed through all of them; he rolled no ones and really wanted to have another go at my tank with his Panzerschreck team. 
More fire from tank and carriers managed to rout Jamie’s isolated LMG team but he spent a CoC die to avoid the resulting bad-things-happen check.

It was Jamie’s turn to roll again.  So of course he rolled double sixes!  One of the other dice was a 1 so the Panzerschreck team deployed and fired at the Comet.  A roll of 11 gave him a solid hit.  I rolled my eight armour-dice and was horrified to see only one save!  Fortunately, though, Jamie managed only three hits.  The Comet’s hull MG was knocked out and the tank took two points of shock.

In the second Phase Jamie's Command Dice again included a 1 so he went for the Schreck’s last shot but missed.
While the tank commander calmed his crew, the carriers opened up at long range at the routed LMG team.  Another rout saw them off the table and the German Force Morale reduced to four.
The next phase gave Jamie a chance to check the nearby JoP for more Schreck ammo.  There was none and he decided, it being dinner time, to withdraw his men.
So, victory to the British on this table.  After figuring the casualties, No.1 Platoon is now seven men below full strength but “Pudding” Lane has restored both the CO’s and the men’s opinion after the farce of his first action.

By the way, for those of you who haven't been keeping score, Jamie got four double phases and three triple phases.  I got none of either.
 

Friday, December 14, 2018

You'd Have to be a Lunatic

In a recent interview on the Beasts of War Youtube channel, Richard (Too Fat Lardies) Clark said, “You would probably have to be a lunatic to want to refight that particular part of the war”. The campaign he had in mind was the less-than-impressive Italian invasion of southern France in June 1940.  

Richard has a case. It was all over in a couple of days and the Italians lost nearly as many men to frostbite in the High Alps as they did to enemy action. Even where the French did cause casualties, it was overwhelmingly their artillery, firing from what is sometimes called the southern extension of the Maginot Line, that did the damage. Nowhere did the Italians penetrate more than a couple of kilometres into France.

However, I already have the French, some Airfix Italians have been sitting in my one-day-I’ll-paint-them pile for years, and the theme for Crisis Point 2019 is “War in the Mediterranean”. So you know what? Call me a lunatic.

Actually, all is not quite as bad as the traditional view would have it. To quote from Wikipedia:

The fighting in the streets of Menton was fierce. The Italians pushed through the Baousset quarter and took the hilltop Capuchin monastery of Notre-Dame de l'Annonciade on 23 June.”

Baousset to Notre-Dame de l'Annonciade is about 5km by road so there's plenty of room for any number of Chain of Command tables in the area occupied by the Italians (eventually).

So I've gone and ordered some Italian LMG teams from Dixons.


Thursday, November 29, 2018

The Road to Bremen - rules calls

I thought it might be useful to capture here some of the rules decisions we've made in playing the Road to Bremen mini-campaign.  I'll update this as we go along.


Panzerfausts – Which model of Panzerfaust is reasonable to use?  Panzerfaust 100 was certainly in use but I understand it hadn’t completely replaced Panzerfaust 60.  My suggestion is that the Germans get Panzerfaust 60 in all scenarios except the one in which they choose the Panzerfaust dump as a support option, where they get the 100.

Raised roads – On Table 2, the roads are described as raised above the low-lying, boggy fields.  These are not high embankments so I suggest the following.  The roads do not block line of sight from one side to the other.  However, infantry (not vehicles or AT guns) deployed immediately behind or moving along the far edge of a raised road get the benefit of light cover against fire coming across the road.
Volkssturm - The campaign rules make it clear that Volkssturm don't get the minus on their roll for Force Morale that Green troops usually would.  Other than that they are silent. Clearly these aren't highly trained professionals with weeks of recent experience on the field of battle.  In a case of "Don't as I do; do as I say" I'd recommend treating them as Green when shot at.  I believe Mark aka The Tactical painter gave them 5 Command Dice and I did likewise.
 

Wednesday, November 28, 2018

The Road to Bremen - Table 1, Game 2


The second action in our Chain of Command mini-campaign The Road to Bremen saw Jamie again defending a small hamlet with just two squads of Volkssturm.  


In the previous battle on this table, my first platoon got quite a beating. 

In my defence we’d declared the Volkssturm to be Average, rather than Green, troops so they could easily stand up against my British in a straight fire-fight.  This time I was determined to make sure they didn’t face a straight fire-fight.  I comforted myself that Jamie was unlikely to roll another six. I surely wouldn’t have to face them at Force Morale of 11 again. 

Hah!  A six it was.  Clearly these Volkssturm are utterly convinced by the Goebbels’ propaganda and determined to sell themselves dearly for the Fatherland.

My own force morale was slightly better this time (nine rather than eight) but I managed to roll only one bonus move at the start of the Patrol Phase.  It wasn’t looking good so far.

I wasn’t able, this time, to establish a Jump Off Point in the village.  By the end of the Patrol Phase I had one JOP about a third of the way along each table flank and one next to the road on my table edge.  Jamie had one either side of the road at the back of the village and one on the table edge alongside the actual “Road to Bremen”.

Jump Off Points - British yellow, German black
For this game I knew what I was up against and I decided to field my No.2 platoon, leaving  No.1 platoon to lick its wounds.  One of the advantages the British have in this mini-campaign is the ability to rotate platoons in and out of the lead position as the situation demands. 

I had 19 points of support and chose a Comet tank, a pre-game bombardment, a Carrier Section (I thought it best to have some extra bodies), and a mortar battery in support. We’ll come back to that pre-game bombardment later.

No.2 Platoon are led by Lt Robert Fox-Hill.  This young man (he’s only 20) is from Leeds and hasn’t so far managed to fit in with the other officers in the mess. The Colonel feels that he’s “Not quite the right sort of chap – after all he plays the wrong code of Rugby!”


The game began with Jamie building up Chain of Command points but deciding not to deploy any troops at first.

I started off with the Comet coming on at the road and immediately going on Overwatch.  I wasn’t going to get caught out again by Fritz’s Panzerfausts.  The 2” mortar team deployed next to the tank.

Jamie then deployed, as he had done previously, a section in the red-roofed cottage to the rear right (as I looked at it).  This, we knew, put the apothecary’s shop between him and the tank if the latter remained on the road (which it probably should, given the boggy ground on either side).

I then introduced Cpl Jones’s section on my left.  He was out sight of Jamie’s first squad and I hoped to draw him into deploying the second on his right flank such that I could defeat each in succession.  Sergeant Street (SL) went in with Jones’s lads to keep them motivated.

The danger now was that Jamie could use his central position to concentrate against my left flank attack.  I’d have to threaten on the other flank too.  Cpl Keeling’s section deployed from the right flank JOP.  They were a bit exposed but I planned to cover them with smoke from the 2” mortar and maybe from the off-table mortars.


Jamie put his second squad into the orchard behind the inn and opened fire on Cpl Jones’s section.  The British were on overwatch and returned fire. They just about got the better of the first exchange of fire. 


With only two squads, Jamie was limited in what he could do.  He brought on his Senior leader in the red-roofed cottage, and then used him to move the section forward to the apothecary’s shop, clearly intending that to be the keystone of his defence.  I’d already taken the chance of moving the Comet into the filed so it could target either building.

At about this point we realised that we’d both forgotten to take account of the British pregame bombardment when the Germans were deploying.  On the fly we decided to say the British had an Adjutant instead.

There now followed a brief period during which casualties were heavy and Force Morale plummeted on both sides. 

On my left, the accuracy of the Bren proved its worth.  A couple of lucky bursts of fire took out the MG42 team and killed the Volkssturm Junior Leader.  The remainder of the squad were soon in full retreat and Jones’s section were on their tails.  Jamie’s Force Morale was down to nine so at least we were now level!

Routing Volkssturm
However, on my right things weren’t looking good.  Jamie had played a Chain of Command die to end the turn and remove all of my carefully laid smoke screen. The Volkssturm Senior Leader’s presence meant that my exposed left flank section was taking heavy casualties.  I decided to send a second section in to reinforce them – at least the hits would be shared between more men!

Unfortunately, this just gave the Germans the opportunity to do more damage!  A single burst of fire from the MG42 and a handful of rifles wiped out Cpl Keeling’s Bren team and killed both Junior Leaders!  Suddenly my Force Morale dropped to four and I had the remnants of two sections in the open, under fire, and leaderless!

The aftermath of that MG42 burst
Showing considerable initiative, Lieutenant Fox-Hill leapt into a carrier on the road (the Carrier Section had arrived but done little so far for lack of appropriate Command Dice) and sped off across the boggy field towards the debacle.

Meanwhile, Cpl Jones’s section had advanced to the rear of the orchard and onto the German Jump off Point.  Not satisfied with this, Jones pushed his rifle team around to the rear of the village and onto another JOP!  I played a Chain of Command die, captured both JOPs, and reduced Jamie’s Force Morale to four.

Cpl Jones's men capture their first Jump Off Point
Sergeant Street, meanwhile, sprinted off up the Road to Bremen to capture the final JOP!


The battle then settled down into an extended firefight – Jamie’s guys firing from the rear windows of the apothecary’s shop at Lt Fox-Hill and his little cluster of pinned riflemen, now reorganised into a single team. The tank and Jones’s section fired at the Germans through opposite ends of the building! 


At some point in all this I managed to complete, and spend, a second CoC die, again to end the turn.  The loss of his last JoP (coinciding approximately with a wound to his remaining JL) reduced Jamie’s Force Morale to two.  By this stage the men in the apothecary’s shop were pinned and it was only a matter of time before accumulated shock broke them giving a narrow and bloody win to the British!

It was a quarter past midnight by the time we finished so we tidied up quickly and left post-game paperwork for the following evening.
What this game taught me was that it doesn't matter how much additional support you've got, if you haven't got the command dice they aren't going to be much use. With just two units, Jamie was almost guaranteed to be able to act at full effect in each phase.  I, on the other hand, made almost no use of the carrier section and never got to deploy my off-table mortars at all.  Any 1s that came up on the command dice were too desperately needed elsewhere!  

Thursday, November 15, 2018

The Road to Bremen - Table 1, Game 1


Jamie and I have been working over the last few weeks towards being able to play The Road to Bremen - a Chain of Command mini-campaign set in northwest German during the last weeks of World War Two.  The plan is to play on Monday evenings while the lady of the house is out at her community choir.

Last night we played the first action, in which Lieutenant Tom "Pudding" Lane's platoon attacked a German village surrounded by low-lying, boggy fields.  On all of the maps in this campaign, the British will be attacking from the left.  Those grey-brown fields are likely to cause any vehicle crossing them to bog down.


As both the British player and the umpire, I know more than I should about the German options but for any given scenario I only know what broad kind of unit I am to face.  In this case it was an understrength Volkssturm platoon.  What, if anything, they would be reinforced with was a mystery.


We've switched the campaign around slightly because my late war British collection is focussed on 11th Armoured Division so Shermans and Kangaroos were replaced by Comets and halftracks in my reinforcement charts.  I rolled the maximum level of support and took a Comet tank, a mortar battery, a medical orderly, and, I think, the battalion adjutant.

The patrol phase went reasonably well and I managed to get a jump off point into the garden behind the thatched cottage, one in the ploughed field quite high up the left side of the table and a third by the road leading onto the table from my edge.  Jamie had one behind each of the further houses and his third on his baseline.

With a significant advantage in Force Morale (11 to 8) Jamie went first and deployed a squad in the house at the back of the village to the right of the road (from a British point of view).  This was an advantageous position because the angle of the road meant the apothecary’s shop was in the way. Any British armour moving up the road would be unable to target them without venturing into the buggy fields.

As my first squad moved forward from the jump-off point on the left side of the table, I used the mortar observer and the 2” light mortar team to begin blocking Jamie’s line of sight to my deployment areas.


Jamie sat on his hands and left me to it.

It quickly became clear that the forward observer, deployed from the left flank jump off point, was in a position from which he’d struggle to put the barrage anywhere other than right at the front of the village.   The 2” mortar team, meanwhile, were in a position on the road from which they could only really add smoke to an area that would already be blocked by the barrage.  Clearly I hadn’t thought this through at all.

Never mind, I could get another section into action and I did so, deploying it again from the left hand JoP.  I could have put a section into the thatched cottage but that would have put it into a straight firefight with the Volkssturm squad in the the house over the road.  Experience has shown that going up against a squad with an MG42 when you only have a Bren is not a great idea.

I also got the mortars firing and brought down a nicely positioned barrage on the village.  in the picture below you can see the British first and second sections moving up from the left-hand Jump-off Point.  A German squad is moving around the back of the village to oppose them.


I’d just got the mortars firing, when Jamie rolled three sixes and ended the turn.


By this time my first section was on the edge of the village.  It didn’t look safe to start trying to bring down another barrage in the cramped quarters of the village.

The 2” mortar was available, though, so I should be able to bring down one of the team’s precious HE rounds against the Germans moving against me.  Except of course I rolled snake-eyes and the 2” was out of ammo!

So I tried pushing forward with the second section (and eventually the third) but the dice weren't kind and I found it very hard to coordinate the advance.  My first squad was pinned and the close terrain made it hard to find a decent way to concentrate fire on the Germans.

At this point I made the latest in string of bad decisions.  I brought on my Comet tank.


With one German squad hiding in a building and the other in the open but both on the opposite side of the village, the tank wasn't exactly able to influence matters.  My continued ability to throw nothing but fours and fives meant that I was building up Chain of Command points but I wasn't getting the Comet into action.

Evventually, however, a couple of phases with three rolled allowed me to bring the tank into a position where it could fire (to no great effect) on the Germans in the village.

Of course that put it within Panzerfaust range. It now emerged that Jamie had chosen the Panzerfaust dump as his only support option on this table.

A couple of brave men ran out into the street and Jamie rolled an adequate number of fives and sixes. My saves were nowhere near enough and the tank was knocked out.  The only slight chink of daylight was that the tank didn't explode so I didn't lose the Junior Leader as well as the support element.


However, with time ticking on and with my force morale down to 4 against Jamie's eleven (I'd earlier had a leader slightly wounded and Bren wiped out by MG42 fire under the control of Jamie's platoon commander) I decided to withdraw and try again another day.

So first blood to the Germans.  Given the difference in force morale, all of their casualties will be back in the next action while the British will be down seven men!  The only advantage I have is that I now know what I'm facing when we fight this action again.

In retrospect, I perhaps should have made the Volkssturm Green troops, which would have given me a better chance in a straight firefight.  On the other hand I realised afterwards that the British don't get the mortar battery the first time a table is played (not that it helped me at all).

Oh and finally, the big error on my part.  I had a full Chain of Command dice at the end; I should have used it to interrupt and machine-gun the two guys who ran out in front of my tank!

The British CO's opinion is -1 and the men are equally unhappy with Lieutenant Lane's performance so far.


Friday, November 9, 2018

The Miller Told His Tale


I spent my commute yesterday listening to the latest episode of The Miller’s Tale – a Wargaming Podcast. 
Prior to this Summer, Mike Whitaker was a fixture on the Meeples and Miniatures podcast.  I enjoyed his contributions for their dry wit and I was disappointed when Meeples host Neil Shuck announced a change of line-up that saw Mike excluded henceforth.

All is not lost, however, as Mike has now resurrected his own podcast, The Miller’s Tale.  I understand Mike lives in a converted mill, hence the title (though I suspect given Mike’s musican interests there may be a hint of Procul Harum in there too).
The latest edition has Mike giving a considered review of the Too Fat Lardies company-level WW2 game I Ain’t Been Shot Mum. As a Lardies fan who hasn’t yet played that game I was interested to hear his views. 

OK, so IABSM’s ground-scale is pretty much spot on for 1/300th scale models?  At first, I thought, “Ooh it would be interesting to have a go at these rules using my 6mm collection”.  However, it becomes apparent from the number of individual figures in a section is important and that you need to remove individual figures as casualties occur.  I’m not sure I’d want to be fielding individually based 6mm tall figures; it’s easy enough to lose 20mm figures among the undergrowth on a well-detailed table.

I agree with Mike that some degree of uncertainty for the commander is a key part of any enjoyable wargame.  His description of “chess with tanks” for a game that doesn’t have restrictions on players’ ability to command their model troops, strikes me as right on the nose.  I’m slightly concerned that IABSM way go a little too far the other way, for me, in this regard. 

I wasn’t happy with the same company’s version 1 of Sharp Practice as it seemed that an unfortunate run of card play could completely ruin a player’s day (and indeed an umpire’s scenario).  And don’t get me started on that damned annoying remember-to-count-the-ones-and-sixes mechanism for random events.  I’m a little concerned that IABSM (being a generation older than Chain of Command and SP2) may suffer from some of the same issues.

That aside, IABSM may be worth a look.  I just need to ask myself, do I want a company-level game?

At the moment I can run reinforced platoon-level games with Chain of Command or Arc of Fire.  I can run Battalion- to Brigade Level games with Tac WW2 and Brigade-plus games with Blitzkrieg Commander.  Beyond that I suppose I could use Megablitz but I’ve no great wish to go that big.

So, there is potentially a company-sized gap in the middle there but do I want to run company-a-side games?  Well certainly not if it’s going to involve investing in a new scale but if I could use 6mm…?  Maybe, but I don’t immediately feel the urge.

It was good, though, to hear a review from someone who has been playing a set of rules for some time.  I’d urge Mike to go on doing this.  If I had access to podcasting hardware I ought to think about doing something similar for Arc of Fire.

I really enjoyed the episode and, given Mike’s general focus on historical gaming, I think it’s not unlikely that The Miller’s Tale could become my favourite wargames podcast.


Thursday, November 1, 2018

Fiasco Purchases

It was Fiasco last weekend and Jamie and I had our usual visit, although this year he wasn't coming from York and I didn't end up driving him back there afterwards (MA course being over).

I was fairly restrained in my purchases.  Apart from a bottle of paint and a single Celtic warrior from a scrabble box, my only purchases were these two houses.


They're 20mm MDF; a house and a shop from a company called Dave's Wargames.


I haven't come across this guy previously but at eight quid a shot they seemed too good to pass up, particularly as I want some buildings for a forthcoming Chain of Command campaign covering the fighting for Bremen in 1945.

They don't come with instructions and I found a couple of points where I suddenly discovered I was in the process of going wrong but in no case did I end up cocking up too badly.

As you can see I've added some Green Stuff to remove those annoying lugs poking through the roof.  The next step, I think, is to add some timbering and render to make these guys look more Westphalian.


Tuesday, October 23, 2018

Ferrocarril de Veracruz II

Last night Chris came over and we had another go at the Sharp Practice 2 scenario I'm working on for a future Sheffield/Yorkshire Lardy Day.

Chris took on the role of Captain Jean Jandou, the French commander, while Jamie played El Zorro Gordo, the local guerrilla leader.

Since the last time we played the scenario, I've made a few changes, which I won't go through here in detail in case you get to play in a future version.

The table depicted the workers' encampment where the Veracruz-to-Mexico-City railway line is being built.  The liberal guerrillas are planning to burn the camp and steal all the construction tools (the railway workers have already fled) while the French (Turcos and Contra-Guerillas) plan to stop them.


The game began with El Zorro Grande's guerrilla group in the workers' camp and straight away burning one tent and loading the associated tools onto their mule train.

Meanwhile (foreground below) a unit of red-jacketed State militia, loyal to the Liberal cause, were making heavy weather of advancing through the uneven ground of recently cleared undergrowth the threaten the French left...


The also red-clad contra-guerillas arrived to the French right and were soon hotly engaged with the guerrilla skirmishers.  Unfortunately their commander, Lt Steinmetz, found himself barged to the ground as his men pushed forward to engage the hated enemy (below).


The contras took some serious fire but with admirable discipline they kept up controlled volleys whilst Steinmetz dusted himself down.

On their left, Capitaine Jandou and his Turcos arrived, their skirmisher group under Sergeant ben Hammim sniping at the guerrillas from the cover of a railway truck....


Jandou carefully advanced his men and then wheeled them inwards so they could subject the camp to withering cross-fire.


The fire of the two Imperialist formations was too much for the guerrilla skirmishers.  Casualties were mounting when suddenly, with a harsh cry, El Zorro Gordo fell to the ground.  He was mortally wounded!

The guerrillas made for the hills whilst Juan Burro tried his best to get his mule-train away.  With three tents burned and the mules loaded with at least some tools, the Liberals were not far off what they could call a victory.  One more tent and a successful escape would do it!

The arrival of Liberal cavalry hinted at possible victory but casualties were mounting.  Were the horsemen perhaps too late?


As the mule-train departed, the cavalry tried to ignite the nearest tent but this seemed to be beyond them. Perhaps some house proud navvy had just washed this one and re-erected to dry in the sun?  

On the Liberals' right, the State Militia, their old smoothbore muskets wavering before them as they advanced, threatened to outflank the Turcos...


And still that fourth tent wouldn't burn...


As the Contras advanced on the camp, the Turcos wheeled again and poured a fierce volley into the Liberal militia.  They staggered back under the weight of fire.  Both groups were forced to make an involuntary withdrawal, their formation was broken and the last opponents of Liberal Force Morale were lost.  The militia had not even fired their muskets!


The result was a clear victory for Chris and the Imperialists.  The unlucky loss of El Zorro Gordo was crucial.  Without his presence Jamie had no way to rally off accumulated shock and he lost the ability to move swiftly from tent to tent as he had done in the previous play-test.

I'm considering a few more changes to the scenario.  In particular I'd like to give the Imperialist player some more interesting tactical choices.  More on this when I've cogitated on the matter.