Sunday, October 29, 2017

A Borie in a Day

A borie is a single-room stone hut, particularly found in Provence but in one form or another widely distributed throughout the Mediterranean basin.  I wanted something of the type to act as the dwelling of a hermit in a forthcoming Dark Ages game.


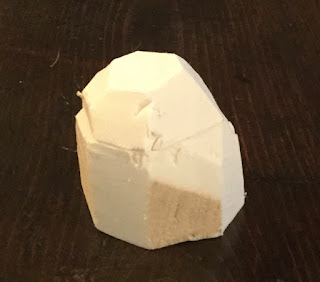
On Saturday afternoon I started with two pieces of Kingspan wall insulation stuck together with my hot glue gun.


These I carved roughly to shape...


...and then gradually more precisely using one of those DIY knives with the snap-off blade fully extended.

When it was carved to shape I started to engrave the stonework with a ball-point pen...


...Oh and I cut out the doorway and inscribed a lintel over it.  Then I went out for pizza.

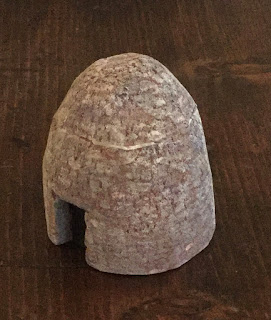
When the whole thing was scribed, I painted it with textured exterior masonry paint all over....


...and that was the end of Saturday.

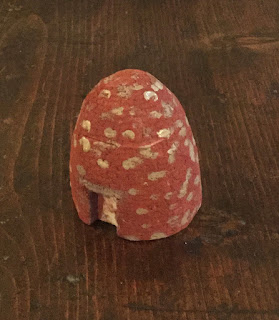
On Sunday morning I began painting.  Using a chisel shaped brush held so that the applied paint was in the same orientation as the individual stones I applied dabs of colour randomly across the stonework.  I started with a light brown...


... and then went on to grey, pale flesh colour, purple, and green.


I painted the interior of the door space black and made sure that the lintel was a single band of colour and then I started dry-brushing.  Grey-green first...


...and then Iraqi Sand and finally a light brush of pure white and I was finished.  It was now 10am on Sunday morning and time to go to Leeds for the Fiasco show.  21 hours elapsed from raw foam to finished article.


Monday, October 23, 2017

A Bit of Solo Chain of Command part 2

When we were last observing the action between the French and the Germans in our distinctly shell-damaged French city, things had rather bogged down.

I picked up the dice again on Sunday morning and things changed rapidly.

In the picture below you can see a French section launching a close assault on Germans in the back yard of the large tenement building.  I launched the French assault thinking that they could probably overwhelm the German defenders in the first yard before having to take on the LMG team in the second.


Having reread the rules, though, I wasn't so sure.  The dividing wall between the two yards is over man height; crossable but it takes a whole phase to do so. Did the presence of the French within 4" bring both German teams into the fight?  I decided that it did but the Germans weren't going to get the benefit of their LMG in the fight.  Even so the French stood a reasonable chance of winning.

I had not, however, allowed for the vagaries of the dice. Rolling about 20 dice the Germans got eight 5s and a 6 killing nine Frenchmen for the loss of just four of their own.  What's more, the French section leader was wounded. The French section fled the table taking the platoon sergeant with them!

I then managed to roll the highest possible loss of Force Morale (six points) as a result of the bad things that happened.  This took the French down to three points and reduced them to rolling three command dice henceforth.

Meanwhile, on the other side of the table French Force Morale was further reduced by continued German LMG fire at the broken remnants of the French rifle team that had previously suffered from a flamethrower attack outside the kiosk. Now the Germans launched a final attack on the men sheltering within that false strongpoint.


A flamethrower burst from one side and a close assault on the other put paid to French resistance.

So that's scratched the Chain of Command itch for a few weeks, I guess. It also inspired me to tidy up some the paint jobs. Many of the figures I was using were first painted twenty or more years ago.


Sunday, October 22, 2017

A Bit of Solo Chain of Command part 1

I've had a bit of a clear-up in the games room and been able to set up a small solo game of Chain of Command on my map chest.  It's another urban game but this time using early war German and French platoons.


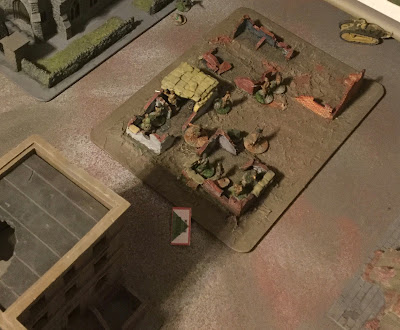
I'm playing scenario 3 (Attack vs Defence) and the Germans are attacking from nearest to the camera.  Above you can see the end of the patrol phase.  The end comes pretty quickly with such a small table.

The game began with the Germans getting two phases and pushing forward an section to the church on their far left.  Shortly after that the French pushed forward a section on the opposite flank and rolled very high on their movement dice.  Before I knew it they had occupied one of the German jump off points!


The German commander responded by throwing forward one of the two (yes, two!) flamethrower teams he'd selected to support his advance.  They routed the French rifle team but thanks to a roll of 1, there was no loss of French Force Morale.


but still, with the remainder of the French section about to occupy the tobacconist's kiosk there was no immediate prospect of the Germans being able to use that JoP.

Meanwhile on the German left a firefight is developing between a German section in the churchyard and a French one in the ruins.


The French whittle away the isolated German LMG team while the Germans are unable to spare Command Dice to resolve the situation.  First the LMG team is wiped out (-1 from German Force Morale) then suddenly a French tank appears!


Yeah, don't worry too much, Germans, it's only an FT17 with a 37mm gun.

On the right flank I've replaced the kiosk with a paper outline so I can see which figures are firing from which window.  There being no window on the near side, there's a pause during which the Germans can organise themselves for a close assault....


So the Germans on the left need to withdraw their partly exposed rifle team and maybe bring up some kind of anti-tank asset and the Germans on the right could do with clearing out the kiosk so they can recapture that jump-off point before the turn ends.  

Interesting point, they have a completed Chain of Command die.  Can you use one to move a JOP that's been captured?  I guess not.

More later when I've managed to fit in some more play.

Monday, October 16, 2017

The Borsetshires at Vimeiro

Saturday saw the first game proper of my attempt to follow the Borsetshire Regiment through the Peninsular War.  I'm regarding the Obidos action as having been a rules teaching session.

Our action took place on 21st August 1808 near the Portuguese village of Vimeiro.  There, Sir Arthur Wellesley is holding a defensive position along a reverse-L-shaped line of hills.  He is under attack by the army of Marshal Jean-Andoche Junot. Junot has attempted to outflank Wellesley by sending troops to attack the left flank of the British position on the north-south ridge.

Wellesley reacts by moving his troops north to reinforce the north-south ridge.  Having an elevated position and the interior line he is able to respond quickly to Junot's move.  So for so historical. However....

One of Wellesley's ADCs, Major Hector McLeod, was sent to make certain that a key bridge north of the British position had been destroyed as per the general's instructions.
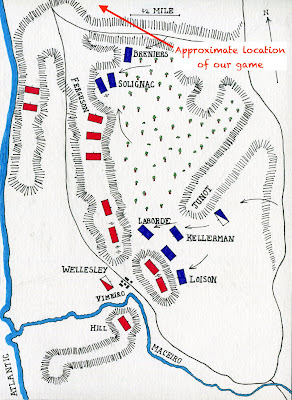
Situation at Vimeiro after Wellesley had shifted
his right flank forces to the north-south ridge.

Finding the bridge intact and no sign of the engineers sent to destroy it, McLeod hurried back to the British lines and commandeered the first troops he could find to defend the threatened sector. These just happened to be the light company of the Borsetshires and some soldiers of the 95th Rifles.

Meanwhile, Captain Etienne Choufleur of the 11eme Hussards had also discovered the unguarded bridge and dashed off to gather whatever troops he could find to force the bridge and win eternal glory!

Our table looked like this:


The north is at the far end so this photograph shows a bird's-eye view from above the French forces attacking Wellesley's left.  

The river was passable at the bridge, obviously, but I allowed for certain river sections to be fordable on a roll of 6 on an ordinary die.  The French ended up deploying near the curve of the river in the north but unluckily none of the three possible fording locations at that end of the battlefield proved to be practicable.  This led the French with no alternative but the march to the bridge.

The French had:
One group of hussars under Choufleur
One group of dragoons under Lt Delaborde
Five groups of line infantry under Lt Duval, and
Two groups of voltigeurs under Lt Maurice.

The also had a fixed secondary deployment point, an ammunition wagon and a musician, though none of these played a significant role in the action.


McLeod's scratch force happened to enter closer to the bridge.  He had:

Four groups of light infantry in line, and
Three groups of 95th Rifles skirmishers.  

He was assisted by the officers of the Light Company of whom Lieutenants Villiers and Rogerson played a significant role in the action (i.e. were represented as leaders in the game) and by Lt Smythe of the Rifles.

The head of the British column arrives.
The fighting began with an exchange of fire across a ford that the British had found immediately to the north of the bridge.


The results went significantly to the advantage of the French.  Although Sgt Leblanc of the Voltigeurs was slightly wounded, his men killed three of the Riflemen at the ford in the first volley!


The French now spent some time getting their forces into position to assault the bridge.  Lt Delabord's dragoons moved to a position on the extreme left of the French attack but they did so without any noticeable spring in their step.


With the French rather dawdling in their approach march, McLeod was able to form a line to defend the bridge.


With time running short, Major Choufleur determined that the only way to force the issue was to lead his hussars in a death-or-glory charge across the ford and onto the flank of the British line.

The attack as successful, though not brilliantly so.  The left of the British line fell back in confusion with the beastly Lt Rogerson falling wounded to the ground.  His men were disinclined to assist and left him to the mercy of the French. 


At this point time beat us.  Rolls on the relevant table had been such that very few points of Force Morale had been lost by either side so the action could well have gone on for another hour or so but family commitments didn't allow that.  

The order of card play in the next turn would probably have been crucial. If the British got a couple of command cards early, Smythe's Rifles in the tree-line would have used Sharp Practice to reload and then hoped to pour fire into the hussars before the latter could rally off the shock they had accumulated in the recent fisticuffs.

Given that Wellesley didn't have his flank turned at Vimeiro, we must assume that some deus ex machina intervened and that Choufleur was not ultimately successful in forcing the issue on this occasion.  He will return, however, to plague the Borsetshires in the future.  

The fate of Lt Rogerson remains to be discovered but few will mourn his absence from the Regimental mess this evening.

Thanks are due to Kevin, Phil, Andy and Arthur for their staunch efforts in fighting this action.

Tuesday, October 10, 2017

On the workbench - finishing the tower

The last couple of evenings have seen my Napoleonic signal tower completed.  Here are the last few steps.  Firstly I've added coarse sand around the edges of the base and the tower and plastered the tower itself with tile grout (except in the places where the stones are showing through:


Next the bare stone surfaces get painted with textured masonry paint:


When the tile grout was dry I painted it in random splurges of various shades of brown, cream and pink:


The next stage was to apply progressively paler coats of dry brushing over the top and then to paint in the remaining details.  Sorry, no pics of that final intermediate stage; I thought I'd taken some but apparently not.


Thursday, October 5, 2017

On the workbench - more towering

More progress on the signal tower. Last night I added the door (various grades of plasticard) and the ridge tiles on the corners of the parapet wall (Green Stuff).


Then tonight I've cut windows into the walls and added lintels from thick plasticard.


Also added this evening was the roof hatch (scribed plasticard with hinges from plasticard scraps and plastic rod).


Next up I need to add texture to ground and tower and then start painting.

Tuesday, October 3, 2017

On the workbench - the signal tower continued

I spent a pleasant couple of hours this evening listening to music and progressing the building of my 20mm scale signal tower.

First up I cut to shape the plastic strips I'd previously identified to give a sloping surface to the top of the parapet walls.  As you can see I've also added a roof to the tower.  This is made foamcore with floorboards scribed in with a pen.


There's a rare earth magnet embedded in the underside of the roof.  It'll be useful when I come to install signal equipment in the tower.

Oh and I've cut some steps into the approach ramp.

And finally I've added the pantiles to the tops of the walls.  They are made out of some fine corrugated cardboard.


Monday, October 2, 2017

The Two Towers

I've made some progress on the signal tower this evening.  Glued together the main structure, added the entrance steps and generally glooped the base...


... funny, the word "glooped" doesn't seem to appear in my Mac's dictionary.


The second of our Two Towers appeared in the post today. It's the (long overdue but I wasn't expecting it so haven't missed it at all) souvenir gift from the 2016 Berkeley Hordes of the Things Tournament.


I know, weird isn't it?  It rather reminds me of the Unseen University in Ankh Morpork.  I believe it's sculpted by Dreamholme Studio and was kindly mailed to me by Steve Price.  There's also a second one for Jamie but "The Three Towers" doesn't have the same resonance somehow. Thanks Steve!


Looking at the doors I'd say it's just about 15mm scale.  It's crying out for a nice paint job.  I'm thinking of painting it in black and white like the medieval buildings in Chester or Herefordshire.

Sunday, October 1, 2017

On the workbench - Tornado and Tower

I fancied a break from 28mm Romans and Carthaginians so I've been working on a couple of other projects.  First up is this Tornado inspired by last weekend's Cold War Commander extravaganza:


It's in a simplified version of German Marinefliege colours and should see action in the Arctic during next years CP6 big game in Grimsby.


It was one of the remaining unpainted models from a mixed batch I got off eBay a few years ago. Actually it turns out it was seven years ago. Wow!

The second project on the workbench is to be a French signal tower for the Peninsula (though it may also see use in Andreivia.

The rock outcrop on which the tower will stand is made of an offset of Kingspan insulation material carved to shape.


The tower itself will be built out of foamcore. You'll note that I've already rebated some of the edges so as to avoid having to cover unsightly ends of foam core at the corners.


I plan to put sloping pantiles on top of the walls around the viewing platform.  I did think of cutting the tops of the walls on a slope but then I remembered these bits of shaped plastic that have been sitting among my collection of terrain making bits for years...


Cut to length and suitably glued in place (a job for the hot glue gun I suspect) they will provide a nice surface to which I can attach the tiles.

More on the tower as it progresses....