Sunday, December 30, 2018

Once Upon a Time in the South

I arranged two wargames over the Christmas - New Year period this time.  We started with a first outing for my Maximilian Adventure forces since I declared them completed.

This was meant to be a four player game but Richard P was unable to join us as his father was ill in hospital.  The best wishes of all at stately Counterpane Manor go out to Mr Philips senior.

Set in 1865, our game involved a force of French Tirailleurs Algeriens (or Turcos) who had been ambushed by a superior number of republican guerrillas and who have retreated to a derelict hacienda.  So far so Camerone.

Where things differ this time is that rescue is one the way.  A mixed column of contra-guerillas is marching to the sound of the guns.

With the Imperialist forces split in two it made sense to have one player looking after the Turcos and one the contra-guerillas.  This left one Republican player commanding the largest single force in the game.  Jamie being the most experienced Sharp Practice 2 player, he copped for that role.  Leo played the Turcos commander and Gus led the contra-guerillas.

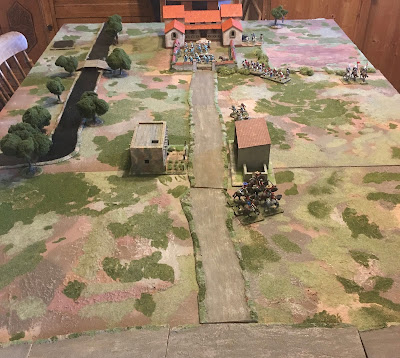
I failed to take a pre-game photo of the battlefield but this early shot shows most of the layout:

The main road from the provincial capital is in the foreground.  A tree-lined stream can be seen on the left.  A side road runs up to the main house of the hacienda past a couple of outbuildings.

The main house (remember a hacienda is actually the whole estate, not just the owner's mansion) has a courtyard in front that's surrounded by eight-foot-high walls.  The front gate has long-since been broken up for firewood but there's a reasonably stout side door on the side facing the stream.

All three players were faced with tactical decisions right from the start.  Leo's Turcos could manage to salvage enough ration boxes and abandoned furniture to build either a barricade across the main gateway or to construct a firing platform to allow one group to fire over the courtyard wall.  Leo chose the former and his men set to work.

Jamie's Republican forces included a group of Zapadores (engineers).  They were likely to be useful in breaking into the courtyard and Jamie set them to work breaking down the side gate.  Clearly this would not be a quiet job so the Turcos were able to plan their deployment knowing that an attack from that quarter was imminent.


Gus meanwhile started with no chits in the hat.  He could only add his officers' chits to the bag from the start of turn two and only if he made the right die roll.  The score needed on the die would vary depending upon which elements of his column he rushed to the scene.  Gus chose to lead with his single group of cavalry and with both of his groups of infantry.  This gave him only a 50:50 chance of getting hit chits into the hat on turn two but he made the roll.

In the meantime, Jamie had brought on three groups of Republican regular infantry to support the zapadores on the river side of the house.  Two groups of state militia and one of skirmishers deployed on the opposite side. Finally, an imposing-looking group of lance-armed Republican cavalry formed up to protect their flank.


Even without the contra-guerillas deployed the forces were beginning to look quite impressive.


The contra-guerillas now deployed on the highway.


A clash between the two groups of cavalry now looked possible.


And the Republican cavalry was supported by skirmishers.


Sergente Asdrubal Cortez was careful to lead from the rear!


But Gus's dice rolling continued to be helpful as far as the arrival of the contra-guerilla forces was concerned.  Their artillery was soon deployed facing the enemy cavalry.


Withering fire from the mountain gun and from the accompanying contra-guerilla artillery soon had the Republican lancers turning tail.


Although the contra-guerilla cavalry had taken some casualties from the fire of the Republican skirmishers.


By now the zapadores has broken down the side gate of the hacienda yard.  Some casualties had been taken on both sides when Jamie decided to launch his regular infantry into an assault through the gate.

I ruled that the defending Turcos would gain the benefit of defending hard cover.  They were also rated as Aggressive.  Together these two factors were enough to put the slightly outnumbered Turcos at an advantage.  Jamie's poor dice rolling did the rest of the job and the Republican infantry were routed.  They fled across the stream taking two Leaders with them.  In one combat the Republican Force Morale fell from nine to zero and the battle was over!


So a bit of an early finish, but it gave us the chance of a leisurely pack-up and allowed Gus to drive back to Nottingham in the daylight.

I'm pleased with the Maximilian Adventure collection; I thought they looked good en masse.  I must organise more Saturday Afternoon Wargames this year so I can make sure they see a reasonable amount of use.


Wednesday, December 19, 2018

The Road to Bremen, Table 2

Jamie and I managed to make time among the Christmas preparations to play the latest game of our Chain of Command campaign – The Road to Bremen.


This latest action saw my British platoon attempting to attack a small farm surrounded by low-lying, boggy fields.  Jamie, defending, had, I knew, a platoon of Heer infantry though I didn’t know what additional supports he might have chosen.


I’ll describe all the locations as left and right in terms of the view from my edge of the table (as per the view above).
The Patrol Phase saw Jamie well established on the hedgeline leaving me with only the doubtful cover afforded by the lateral road.  As they were slightly raised over the surrounding farmland, we decided that roads would give light cover to troops on foot but only if they were stationary immediately behind them.  I had a Jump-off Point reasonably well advanced on my left flank and Jamie had one rather in the middle of nowhere towards his left rear.


Jamie chose to put a minefield in front of the right-hand hedge and a run of barbed wire connecting the two hedges.


With 19 points of support available I decided to go for a tank (a Comet as we’ve switched the campaign round slightly to suit my 11th Armoured Division collection), an engineer section, a medical orderly, the battalion adjutant, and a two-vehicle section of Universal Carriers. 
It seemed obvious to me that Jamie would need to defend the hedgeline in strength. My plan was to establish a base of fire near the centre of my baseline under the control of a Senior Leader. With the two MGs in the carrier section and the firepower of the tank, I could probably hope to gain sufficient superiority over troops at the hedgeline to capture it with infantry sections deployed from the advanced left hand JoP.  The platoon’s 2” mortar would help by screening off some enemy troops (probably those defending the hedge on my right) with smoke.


As he has in every game so far Jamie had rolled a six giving him a starting Force Morale of 11.  At least this time I was on a respectable nine points.
Jamie took the first phase and deployed a section behind the left-hand hedge, near the barn. Their NCO put them on Overwatch.


I then got a reasonable hand of dice and deployed my carrier section on the road and began to pour fire into the German section.  At this point I made a poor decision.  I realised that putting my 2” mortar next to the road on my board edge would mean it as in the open to fire from one hedgeline or the other.  I decided therefore to use the righthand JoP and put the mortar and the platoon Sergeant behind the lateral road.  They were able to put smoke in front of the enemy LMG but the SL was no longer where he should have been – near the central JoP and the road, directing the fire of my support elements!


At this point Jamie got the first of what would be a plethora of consecutive phases and used them rally off shock and pot away ineffectually with his first squad’s rifles whilst deploying a second squad behind the right-hand hedge immediately next to the road.


I tried to fire smoke to mask off the right-hand squad but it fell long. I moved my carriers forward slightly to improve their lines of sight and to keep them away from the board edge in case of forced withdrawals.  I also deployed Cpl Elliott’s section (down two men because of casualties in the first battle) to a position behind the lateral road to the left of the Bremen highway.

At this point Jamie got a second pair of consecutive phases.  He spent both firing causing two fatalities in Elliott’s section and killing one man in my 2” mortar team.
I decided I needed more firepower against the squad facing my left. I deployed Cpl Parker’s section from my left edge JoP and they inflicted a casualty and some shock on the Germans in front of them.

Jamie decided to pull back the squad on the left – exposed as it was to fire from the carriers and from two rifle sections (albeit Elliott’s section was now very depleted).  The other German section continued to fire at my mortar team.
The withdrawal of the left-hand squad allowed me to switch the carrier section’s attentions to their compatriots on the other side of the road.  The effect was impressive – two dead and the Junior Leader lightly wounded.  Unfortunately there was no reduction in Jamie’s Force Morale; still at eleven!

I deployed my mine-clearing team next to the remaining 2” mortar man in the hope that they would share the incoming fire and I reorganised Elliott’s section, moving one man from the rifle team to help keep the Bren firing.  Finally, I moved Parker’s section forward towards the extreme left end of the left-hand hedge.

At this point Jamie’s right-hand squad got their eye in.  A burst of MG42 fire killed the one remaining member of the 2” mortar crew.  Fortunately I too lost no Force Morale – still on nine.

Even more firepower needed!  I brought on the tank, deploying it off the road in the muddy field.  That way it had a clear field of fire past the carriers.  If I didn’t move it there would be no need to worry about it bogging down.


And of course Jamie now got a series of three consecutive phases!  This was getting silly!

The dice weren’t completely kind, though, with many fours and fives accompanying the multiple sixes but Jamie was able to rally off loads of shock and move his left flank LMG into a position where it could fire along the narrow gap between the hedge and the back of the barn.  We noted, though, that this put it directly behind the hedge and so once more targetable by my lads.


When I finally got to go again I had Parker’s section throw a grenade and fire at the newly visible LMG team killing one of its members.

And then Jamie rolled another double Phase (his fourth of the game so far!) and wiped out my wire cutting team.  My Force Morale fell from 9 to 7.  This left Sergeant Hill on his own, cowering behind the slightly embanked lateral road and too far away from the resto of the force to be much use.  Jamie also spent a Chain of Command die to move his left-hand Jump-off Point back to safety behind the farmhouse.  He’d learned his lesson after I captured all three JoPs last time out!

On my next Phase I finally completed a CoC die but more importantly managed to wipe out the LMG team in the left-hand German squad.  The German Force Morale fell from 11 to 10.
With the remnants of that squad looking vulnerable, I decided to launch Parker’s section into a close assault.  It was bloody!  The Germans were wiped out, their Force Morale falling again from ten to eight.  I lost five men killed (including the whole Bren team) and Lieutenant Lane received a light wound.  I spent my CoC die to avoid one morale check but still my Force Morale fell from seven to six.


With but a single Phase (for once) Jamie deployed his third squad by the Farmhouse in the rear, putting them into Tactical.

In response I moved Parker’s section and the lieutenant back behind the barn.  And only just in time as Jamie now got ANOTHER triple Phase, which he used to put down fire across my front, killing a member of the recently deployed mine-clearing team (I’d brought them on to beef up Elliott’s section) but conspicuously failing to hit Sgt Hill.  He also moved forward his third section.


My next phase saw me roll 35556.  Not what I needed at that time but at least the tank could fire. The hull MG put down covering fire on the enemy squad informant of my right and a 77mm HE round decapitated the squad’s Obergefreiter reducing Jamie’s Force Morale from eight to six.


At this point Jamie spent a newly acquired CoC die to ambush with his Panzerschreck team. The round ploughed harmlessly into the mud short of the Comet.
That Panzerschreck round probably passed a few inches over the head of Sergeant Hill who, by now, had managed to crawl to a position nearer to the central road.  At last he could now influence the main battle.  Under his direction fire from the tank and the carrier section devastated the wiped out the Rifle Team of the right-hand squad.  German Force Morale fell to five.
Jamie was now down to one squad and an LMG team on the table.  Fire from my tank and carriers, once again directed by Sgt Hill, killed a member of the LMG team and caused some shock.  I should mention here that I apparently got this wrong - an infantry Senior Leader can't activate a supporting tank.
In the same Phase I sent Parker and Elliott’s sections forward to the hedge in front of the barn.  Oh, and deployed the medical orderly who set off after the wounded Lt Lane.


You’ll not be surprised to learn at this point Jamie embarked on yet another triple Phase. Perhaps more surprising was that he passed through all of them; he rolled no ones and really wanted to have another go at my tank with his Panzerschreck team. 
More fire from tank and carriers managed to rout Jamie’s isolated LMG team but he spent a CoC die to avoid the resulting bad-things-happen check.

It was Jamie’s turn to roll again.  So of course he rolled double sixes!  One of the other dice was a 1 so the Panzerschreck team deployed and fired at the Comet.  A roll of 11 gave him a solid hit.  I rolled my eight armour-dice and was horrified to see only one save!  Fortunately, though, Jamie managed only three hits.  The Comet’s hull MG was knocked out and the tank took two points of shock.

In the second Phase Jamie's Command Dice again included a 1 so he went for the Schreck’s last shot but missed.
While the tank commander calmed his crew, the carriers opened up at long range at the routed LMG team.  Another rout saw them off the table and the German Force Morale reduced to four.
The next phase gave Jamie a chance to check the nearby JoP for more Schreck ammo.  There was none and he decided, it being dinner time, to withdraw his men.
So, victory to the British on this table.  After figuring the casualties, No.1 Platoon is now seven men below full strength but “Pudding” Lane has restored both the CO’s and the men’s opinion after the farce of his first action.

By the way, for those of you who haven't been keeping score, Jamie got four double phases and three triple phases.  I got none of either.
 

Friday, December 14, 2018

You'd Have to be a Lunatic

In a recent interview on the Beasts of War Youtube channel, Richard (Too Fat Lardies) Clark said, “You would probably have to be a lunatic to want to refight that particular part of the war”. The campaign he had in mind was the less-than-impressive Italian invasion of southern France in June 1940.  

Richard has a case. It was all over in a couple of days and the Italians lost nearly as many men to frostbite in the High Alps as they did to enemy action. Even where the French did cause casualties, it was overwhelmingly their artillery, firing from what is sometimes called the southern extension of the Maginot Line, that did the damage. Nowhere did the Italians penetrate more than a couple of kilometres into France.

However, I already have the French, some Airfix Italians have been sitting in my one-day-I’ll-paint-them pile for years, and the theme for Crisis Point 2019 is “War in the Mediterranean”. So you know what? Call me a lunatic.

Actually, all is not quite as bad as the traditional view would have it. To quote from Wikipedia:

The fighting in the streets of Menton was fierce. The Italians pushed through the Baousset quarter and took the hilltop Capuchin monastery of Notre-Dame de l'Annonciade on 23 June.”

Baousset to Notre-Dame de l'Annonciade is about 5km by road so there's plenty of room for any number of Chain of Command tables in the area occupied by the Italians (eventually).

So I've gone and ordered some Italian LMG teams from Dixons.